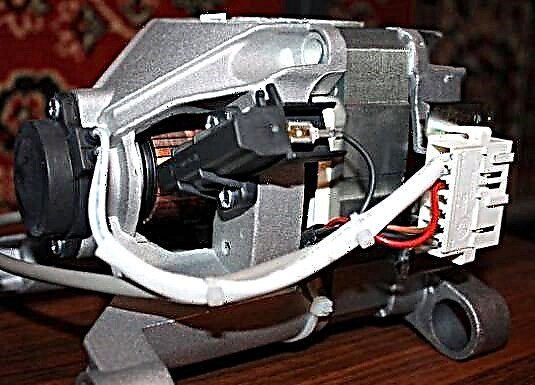
The design of modern washing machines involves the presence of parts that reduce noise and vibration. Depreciation of the tank is performed by a spring damper and a shock absorber. If the machine starts to work too noisy, vibrate and sway when washing, then these parts are out of order.
The article will discuss how to change shock absorbers and dampers. We will step by step consider the entire replacement process and give valuable recommendations with photos and videos.

Shock absorbers: functions and structure
Just note that shock absorbers in different models can have cardinal differences. But in general, their design is as follows:
- cylinder;
- piston;
- return spring;
- stock;
- fixing bushings and liners in the shock absorber springs;
- gasket between cylinder and piston.
As we already said, the task of the shock absorber in the AGR is to dampen the vibrations of the tank. The vibration damping effect is achieved by the movement of the piston, which is located inside the cylinder.
The gasket is saturated with grease that does not dry. When the tank oscillates, the piston enters the cylinder, damping vibration. And the damper spring brings the piston to its original position.
In addition to the grease impregnating the tab, vibration is damped by specially provided openings in the piston. Through them, air passes from one part of the piston to another and vice versa.

Important! In order for the washing machine to work without breakdowns, the force in the shock absorber must be stable. For maintaining stability, several nodes of the shock absorber are responsible at once. That is why the masters do not advise to undertake the repair of this part. It’s easier to throw away the old one and buy a new one.
Shock Absorber Replacement
These parts differ in type of fixation. Some are mounted strictly vertically, others - slightly at an angle. On the one hand, the shock absorber is attached to the tank, on the other hand, like a damper, is attached to the body.
Sometimes these parts are attached with a rod. In this case, to replace the defective part, you need to disassemble the entire washer and remove the tank. Here, the complexity of the work depends on your model of SMA.
As we already said, shock absorbers are not repaired, therefore, if you disassemble the part and come to the conclusion that the shock absorber spring has burst, you can, of course, change it. But whether you will find it for sale is another question. Moreover, you may need to insert a shock absorber and other parts into the spring.
Damper: construction
By design, it is not much different from the above details.
As for damping tank vibrations, dampers have much better indicators for this part. They are more reliable because the springs that return the piston to its place are located outside. Often, a broken damper can be repaired in the event of a breakdown, which cannot be said about shock absorbers.
They are located in pairs from below and perform two functions at once:
- Support the tank.
- Quench tank vibrations.
In such designs, the tank is fixed on top by two more additional springs.

Repair and replacement of a damper with a pressed liner
These dampers are ubiquitous and are used by many manufacturers of washing machines.
The damper dampens vibrations due to the friction of the piston, which is tightly clamped by the liners. The liners are clamped using a bracket, the design of which resembles the letter “P”. The latter is mounted inside the SM with a special gasket.

It happens that the contact force of such liners is noticeably weaker. Vibrations are suppressed worse, but damper replacement is not required - repair will help.
If the vibrations become stronger, you need to tighten the bracket or replace the liners if they are worn:
- Unscrew the 4 fasteners securing the bracket.
- Remove the bracket.
- Flatten the "mustache" details.
- Remove the old liners.
- Install new ones.
- Assemble the damper back.

Replacement Features
Dampers have specialized holes on which they are mounted.
The fixing elements are most often bolts. Removing such bolts, like any fasteners, is not difficult. Having done this, you can easily remove the broken part and install a new one in its place.
In this video, a UK master shows how to change a damper while working through the bottom of a washing machine. If you are the owner of a similar model, then do the same:
Springs: appointment, replacement
The tank spring of the washing machine is paired with the same spring at the top of the washing machine housing. This complex holds the tank and returns it to its original position.
The return spring has two ends, each of which has a hook. On one side, the spring is hooked to the body of the CMA, the other hook holds the tank. Spring breakage usually occurs near the mount. To remove the spring, it is not necessary to follow a strict sequence - you can disconnect it first from the body, and then from the tank or vice versa - it does not matter.
Before replacing the spring, you need to decide how you will remove the defective part.
You can remove it through the attachment point to the tank. To do this, you need:
- Remove the top panel.
- Raise the tank as high as possible and lock in this position. For fixing, you can use wooden pads.
- Pull the spring towards the tank.
- Take pliers and unhook the spring from the tank.

- The last thing that remains to be done is to disconnect the part from the machine body.

You can also remove the spring through the top of the machine:
- The first two stages are similar to those listed above.
- Holding the spring by hand, hook the holding hook with a thin screwdriver.
- Unhook the spring from the housing.
- Take her to the side and unhook from below.
Attention! If some parts interfere with you, you will have to remove them.
Often we are asked how to replace the spring. If you act according to science and hope that the machine will work longer, it is better to change the spring to the original part.
We wish you a successful repair. Successfully replace springs, dampers or shock absorbers, and the machine will work as quietly as after a purchase.